


In honor of the Oscars this evening I offer this life affirming true life experience.
I knew that I was in the right profession when I was watching Beauty and the Beast (animated version, and my favorite Disney animated film, by the way). I think at the Cheri Theater in Boston, if I remember correctly.
At one point Belle is in the village and drops a book in the mud. I gasped when she did that. Loudly, it seems. Loud enough to be laughed at by others in the theater. Just couldn't help myself.
I was both a bit embarrassed and proud.
Sunday, February 26, 2012
Thursday, February 23, 2012
Fake or an homage?
I grew up with these kinds of library bindings. Liked them back then and still do. They are printed book cloth, using heavy library buckram. Which means the cloth is very heavy and durable.
Basically what they did was this: they'd print a design on a roll of book cloth leaving an unprinted strip between the designs. That unprinted area could be the spine of the book.
These books were done in the 1960s for the King County Library and Seattle Public Libraries. I bought them at a Friends book sale because I was so charmed by them.
Eventually they stopped using this type of cloth because it was easier to do them on non printed cloth. Probably cheaper too.

But what I like about them is that the printing on them is to replicate quarter cloth bindings. What??? How about a definition. Quarter bindings have book cloth on the spine but not the corners.
Here is a quarter cloth binding I did of Ambrose Bierce's Devil's Dictionary. If you haven't read it you should, but that's not the point here. But really, you should read it. The black in this picture is cloth and the reddish part is decorated paper.

Compare that with this and you can see what they were doing. Clicking on the pictures enlarges them, which may help you see this better.

Half bindings have cloth or leather on the spine and corners with a decorated paper cover the rest of the cover boards. You've all seen hundreds of them. Here is a half leather binding of a blank book, which I did at school as an example, thus no title on the spine.

Obviously it would be impossible to do a half binding style on these library books because the size of the boards on books are always different so the corners would never line up correctly. Why? Because the corners would have to be pre-printed on the roll of cloth and to do that would require all books be the same size. Which they aren't.
That makes me wonder how wide the book cloth was for these because both usually comes about a yard wide. Were there two sets of patterns side by side on the cloth or were they just one really wide design?
Here is another style. It is more like a design binding! There is no decoration on the back. But notice the decorative line across the top and bottom of the spine. Reminds me of when if something cost a bit more in time, effort, or money it was ok if it make it better or more attractive. Or more fun.

I should also admit that I like how they feel in my hands, how the paper feels, how they smell. Everything. I can't hold one without thinking about walking down the hill to the Green Lake Library, a beautiful Carnegie library that smelled like knowledge.
Saturday, February 18, 2012
Day one of cloth binding class!
Today we had the first day of a five day book binding class. It was a fun day. It's gratifying to hear the students at the end of the day express amazement of how much we covered. Today they forwarded a flat back binding. Next week we'll make the covers for them and start on rounded and backed bindings.
I'm quite happy that we've gotten to this point, it's been a long time coming. First we had to finish building the house and then turning this:

In to this:

Doing all that work made a class like this possible. And so here are the students working away in a truly great space..


Does any bindery have a nicer lunch room than this? I think not!

I'm very much looking forward to next week!
Wednesday, February 15, 2012
Fixor: part deux, finis!
I have a large project ahead of me so I started picking things up and putting them away. Don't know why, except it always makes me feel better about the world. And myself.
In the midst of that I found a bag of shellac which I've had for several months, since I made some blocking powder (which I will post about shortly). Shellac comes as flakes but those flakes turn into a block if they sit around too long. This bag had four or five blocks the size of marbles and about the same volume of flakes. I needed to do something with it.
So I decided to make more of the fake Fixor glaire, used in gold tooling as described in the previous blog entry.
The beauty of fixor, or other shellac glaires, is that they pretty much last forever. So I decided to use the whole 100 g. bag and be done with it. The shellac was light yellow in color, bleached and unwaxed. Peter Geraty (who steered me to this recipe) wrote that generally orange was the best shellac to use but that he didn't know if that applied to our purpose.
The recipe is this (Wehlte p. 217):
10g. borax / 200 cc water / 30 g. bleached shellac
Disolve the borax in hot water. Sprinkle in the shellac. Do not boil.
Having 100 g of shellac I obviously increased all the quantities so that I could use the whole bag. I took out my least favorite tool in my bindery, the hot plate, and went at it using my glass pyrex pan since I didn't know whether it was best to avoid metals when making this stuff (like one should do in making paste or methyl cellulose).
I kept the hot plate at half temperature (I think the hot plate that burned down the building I had just moved out of was probably set higher than that, but the fear remains!) and dissolved the borax instantly. The shellac took probably 20 minutes of stirring to get it all dissolved. I wondered what would have happened if I pulverized them in my coffee grinder (which I don't use for coffee, by the way) but I also wondered how long it would take to dissolve the marble sized pieces. Seemed more therapeutic to stir and stir and stir.....
It came out this color:

Here is a picture of Fixor, which has been diluted 1:3 (Fixor : water) to its usable consistency:

I'd say it looks quite similar. Obviously using a different colored shellac would result in a different color. Again this was light yellow shellac.
But all that matters is whether it works. I took a calf skin which I had dyed for tests on this. In the right section I applied Fixor, in the middle of this image I flooded the space with this homemade fixor (I can't capitalize fixor if it's not the brand name Fixor, can I? Too bad I'm not married to an editor. Wait! I am!) The left section of this picture is two lighter coats of this homemade solution applied more carefully. By this I mean that I used a cotton ball to spread the solutions over the whole part of the skin, not just in the impressions.
The surface of the leather after this application of Fixor and fixor didn't show much of a difference between them.

Looking closely at them anyone would have a hard time telling the difference between them, or deciding which was better to use. These were all just a one strike impression, going back in would make them all more consistent and better. If any section was worse than the other two it was the flooded section, which one wouldn't do anyway except to mess about.
A big, big thanks needs to go to Peter Geraty for pointing the way in this. It's much appreciated.
Monday, February 13, 2012
Fixor problem
Several friends have been using Fixor for their gold tooling. (Basically it's a glaire used to adhere the gold to the leather). Fixor comes as a liquid that is then diluted in water, generally 1 Fixor in 3 water.


For the most part I have used BS glaire from Hewit, but thought I'd give Fixor a shot more out of curiosity than anything else.
I ordered it expecting it to be this:
Can't really tell from a static picture, but it's a liquid. If you shake your computer you probably can see it swirl around the bottle. (I got my hands on this bottle in the midst of this episode, which means I have enough Fixor to last me a long, long time and this whole episode is really about solving the puzzle more than meeting a great need.)
Instead I received this. I started calling this gel Fixor.

I asked Talas about it and was told that was how Fixor came to them. Then I put the question out via email and online and no one had ever seen Fixor like this before and had no idea how to use it. Most had bought the liquid Fixor from Talas but had never seen the gel.
Talas, who were trying to be helpful throughout all this by the way, contacted Relma who said it was normal and that "we recommend to dilute the Fixor with 25/30% water proportion, it will be enough."
And it would make sense to ship Fixor overseas in a more concentrated form, so I thought that answered the "why?" part of the question. That left the "how?" to be figured out.
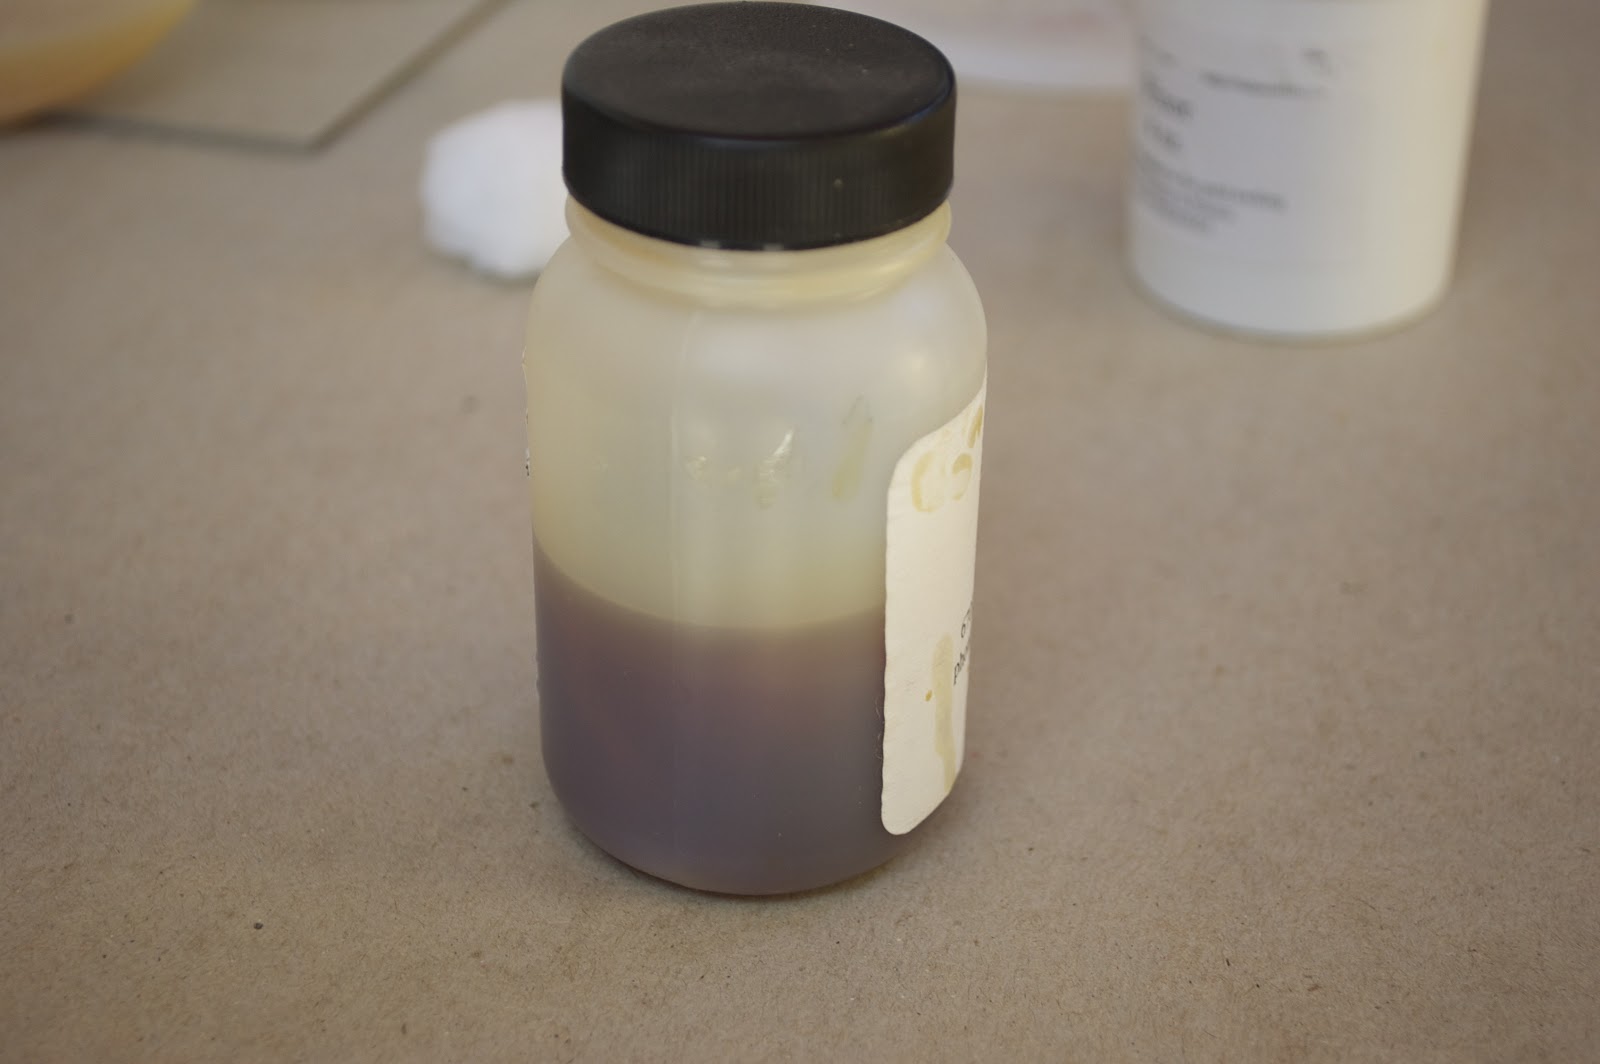
So I portioned out some of this Fixor in water and placed them in jars in differing concentrations. For several days I shook them every hour or so. They never diluted and after three weeks they still look like this:

I wasn't about to ruin a blender to get this suspended in the water so began to consider whether it wasn't supposed to be cooked.
When the listserv discussion was going on Peter Geraty posted that he had figured out that Fixor was basically saponified shellac and gave a recipe from Kurt Wehlte's book "The Materials & Techniques of Painting." The recipe is on page 217. I made it and it works well which would have solved the Fixor problem, but I am still have been bothered by this blob of Fixor I paid for, was stuck with and wanted to make useful.
One key to the saponified shellac recipe is to heat the water and then add the shellac, but never letting the water boil. So I wondered what would happen if I tried this with the gel Fixor. It did do better at dissolving the Fixor but when I strained it after cooking and stirring it for several minutes a surprisingly large amount of solids remained. And the resultant solution was much lighter in color than the diluted liquid Fixor.
In fact, and I'm not sure you can see it in this picture (it's hard to photograph liquids using an automatic focus camera) there is still quite a bit of solids in the liquid even after straining, which I've had to remove from the impressions when using it. It is also much cloudier than Fixor diluted from the liquid.:

Did it work as a glaire? I'd say yes, but it wouldn't be my choice. In fact if all they had was the gel Fixor at Talas I'd get something else. Unless someone could figure out how to dilute it.
Part of me wonders if I'm not missing something here and I sort of hope someone has cracked the mystery of dissolving blobs of Fixor. The obvious answer is to buy Fixor in a liquid state, which probably means getting it from someone other than Talas.
Comments appreciated.
Friday, February 10, 2012
Rock and Roll part 2
At the time I bought the book I posted last week I also bought this book. Diane and I would drive around Mass. on Saturdays and just stop in small towns and look around, then drive on to the next town. It was a fun way to spend a day. At a store that sold odd lots of things they had a pile of books, and I bought these two because I like the genre of music. But also because they were sewn bindings so I could do something with them.
This one is called The Book of Rock and was published by Rolling Stone magazine. It's pretty small, 3.25 inches tall and 2.75 inches wide.
I thought it would be fun to make a decorative box for it, and decided on an amplifier. I wavered between spending a lot of time making an accurate model of one using Sculpey or something like that but that didn't really interest me. Lugging amps around was never the most fun part of playing music, so maybe I had issues. So I made this, which I liked because I thought the cartoonish nature of it suited the content more.
The box is leather with silk over where the speakers would be and painted super glued down where the controls are.

The front cover is the same scans of ticket stubs I used in the other book. Concerts mostly seemed to me to be about the joy of music, the fun of enjoying something with a crowd, and spontaneity of the show and feeling like you learned something about the artist just by watching them perform. So, thus the stubs to commemorate the best thing about rock music.

The back is money, which is what everything ends up being about in the end. By the way, the name on the amplifier is sort of the Swedish word for money. The endbands were money as well.

Here's the whole thing:

I did it as an onset board binding, where the leather was on the book before the covers were attached. It allows for a very clean edge where the cover meets the leather.
It was an interesting project, because it's outside what I normal do but it's something I wanted to try and I'm happy with how it came out.
Thursday, February 2, 2012
Book Fun
Several years ago I bought a book that had something to do with rock music. It was a sewn, softcover binding so I bought it thinking it might be fun to do something with it. Other than read it, of course.
It was produced by, I think, the Rock and Roll Hall of Fame in Cleveland, probably the most disappointing place I've ever been to. Really.
I hemmed and hawed over what to do but finally settled on doing something iconic. For the front I modified a picture of Dave Davies and for the back a picture of Pete Townsend. For editorial reasons, of course. They are leather onlays, thin pieces of leather pasted over the cover leather. I decided to stick with black and red, two perhaps too obvious choices but I really liked the red skin.
Here's the front:

Here's the back:

For the end bands I used zippers:

And, for the endpapers I scanned ticket stubs from concerts I've attended. I challenge you to find how many Kinks stubs you can see. I should add that I placed the Bob Marley stub prominently because it amazes people twenty years younger than me that I actually saw him at the Paramount. It was an amazing experience for several reasons I don't have time for right now.
I encourage you to also look at the prices. What's funny is that I don't have any stubs from Bad Company (!), or Johnny Guitar Watson or other shows I remember so well. But I did still have my stub from a show at the Whiskey in LA, hopefully I get some points for that. I just won't tell you who I saw, I'd be deducted points for that.
(Clicking the pictures enlarges them.)

I did another book about rock, that I bought at the same time. I'll put that up later. Probably.
Courses for 2012
I've posted classes which I'll be giving during the rest of this year.
When I was thinking of what classes to offer, it occurred to me (perhaps incorrectly) that no one offers classes in limp leather bindings, or single flexible. Since I enjoy doing those bindings I thought I'd offer them as classes and see if anyone is interested in taking them.
I've come up with a way of making limp leather bindings that are more flexible than the traditional way and wanted an opportunity to share that with students. Over the past year I've done 3 limp leather bindings, which is more than I ever expected I would. Two of them were folks who were tired of how bonded leather bindings work. Or don't.
The single flexible full calf binding class will also include ploughing in boards, which I've obviously done a video about. It's a great binding. Part of me thinks I'd like to just do them over and over again. But then I might get a bit tired of. Maybe. Or not.
 Also, I'm doing a limp vellum class. That's the book to the left. In that class there will also be time for some paper case bindings as well. Should be fun.
There's also classes on box making, millimeter bindings, and several more.
I'm looking forward to them!
Here's the link:
Subscribe to:
Posts (Atom)